Starlink RV Installation Guide: Get Online Off-Grid
Starlink has completely changed the game for RV owners who crave reliable internet anywhere. Imagine parking in the wild countryside and still getting download speeds of 50 to 150 Mbps right in your van. Most people think setting up satellite internet on a moving home must be a tangle of wires and endless frustration. The real surprise is how simple it can be once you know the key steps people overlook.
Table of Contents
- Step 1: Assess Your RV’s Setup Requirements
- Step 2: Purchase Necessary Starlink Equipment
- Step 3: Install Starlink Dish And Mounting Hardware
- Step 4: Connect And Power Up The Starlink System
- Step 5: Configure And Test Your Internet Connection
Quick Summary
| Key Point | Explanation |
|---|---|
| 1. Ensure Unobstructed Sky View | Identify a 100-degree clear arc towards the northern sky for optimal satellite signal reception. |
| 2. Verify Power Compatibility | Check that your RV’s power system can support the Starlink system’s 100 watts draw before purchasing. |
| 3. Conduct Methodical Installation | Follow precise guidelines for dish placement and secure mounting to enhance long-term signal reliability. |
| 4. Configure Network and Test Speeds | Use the Starlink app to set up and run speed tests for connectivity assessment and performance verification. |
| 5. Implement Network Security Measures | Change default passwords and set up encryption to protect sensitive data during mobile internet usage. |
Step 1: Assess Your RV’s Setup Requirements
Preparing for a Starlink RV installation requires a thoughtful assessment of your vehicle’s unique characteristics and connectivity needs. Your success hinges on understanding the spatial dynamics, power infrastructure, and potential mounting locations within your recreational vehicle.
Begin by conducting a comprehensive survey of your RV’s exterior surfaces. Satellite dish placement demands unobstructed sky visibility, which means identifying areas with minimal overhead interference from solar panels, air conditioning units, or roof structures. Typically, the optimal mounting zone provides a clear 100-degree arc towards the sky, ensuring consistent satellite signal reception.
Power configuration represents another critical evaluation parameter. Your Starlink system requires a stable electrical input, preferably drawing from your RV’s DC power system or shore power connection.
Measure the available amperage and verify your electrical infrastructure can support the approximately 50-100 watts the Starlink router and dish consume during operation. Proximity to power outlets and potential cable routing paths will significantly influence your installation strategy.
Mounting surface considerations are equally paramount. Different RV constructions present unique challenges metal roofs, fibreglass surfaces, and wooden frameworks each demand specialized mounting approaches. Assess the surface material’s structural integrity, considering factors like weight distribution, potential vibration during travel, and the mounting hardware’s compatibility with your specific surface type.
Key verification criteria for this assessment stage include:
- Identifying a minimum 12 x 12 inch clear mounting area
- Confirming unobstructed sky view from potential mounting locations
- Verifying power system compatibility and available amperage
- Evaluating surface material and potential mounting hardware requirements
By meticulously examining these elements, you establish a solid foundation for a successful Starlink RV installation.
Below is a checklist table summarising critical verification points to assess your RV’s readiness for Starlink installation. This helps ensure that you meet all location, power, and mounting prerequisites before starting setup.
| Verification Item | Requirement | Notes |
|---|---|---|
| Clear Mounting Area | Minimum 12 x 12 inches | Check for interference from existing roof elements |
| Sky Visibility | Unobstructed 100-degree arc (typically north) | Avoid shade from solar panels or AC units |
| Power Compatibility | 12V DC or shore power, 100W available | Older RVs may require inverter upgrade |
| Available Amperage | Supports 50-100W draw | Measure current capacity on planned outlets |
| Surface Material Assessment | Compatible with selected mounting hardware | Metal, fibreglass, or wood needs different fixings |
| Cable Routing Feasibility | Close proximity to power and minimal obstacles | Plan routes to reduce risk and strain |
| Remember that preparation prevents poor performance your thorough initial assessment will directly impact the reliability and effectiveness of your mobile internet setup. | ||
Step 2: Purchase Necessary Starlink Equipment
Selecting the right Starlink equipment transforms your RV from a mobile space into a connected haven. Your purchasing strategy requires careful consideration of mobility, power requirements, and specific RV usage patterns.
Starlink Roam represents the primary solution for mobile internet enthusiasts. This specialised plan allows internet connectivity while travelling, offering unprecedented flexibility for digital nomads and RV adventurers. Learn more about our recommended mounting solutions to complement your equipment selection.
Budget considerations play a significant role in your equipment selection but more so usage and power availability. The standard Starlink Roam suits professional with a large power bank. The Mini is the ideal solution for most RV users. Pro tip: always factor in potential accessories like mounting hardware and DC power conversion.
Power compatibility remains crucial when purchasing your equipment. Verify your RV’s electrical system supports the standard 100-watt power draw of the Starlink system. Most modern RVs can accommodate this, but older models might require additional power management solutions or inverter upgrades.
Verification checklist for equipment purchase:
- Confirmed Starlink Roam plan availability
- Verified compatibility with RV electrical system
- Selected appropriate mounting accessories
- Budgeted for initial equipment and potential additional components
By methodically approaching your equipment purchase, you ensure a smoother installation process and more reliable mobile internet connectivity. Remember that your specific RV configuration will ultimately guide your final equipment choices.
Step 3: Install Starlink Dish and Mounting Hardware
Mounting your Starlink dish requires precision, patience, and strategic planning to ensure optimal signal reception and long-term reliability. This critical step transforms your equipment from a collection of components into a functional mobile internet system.
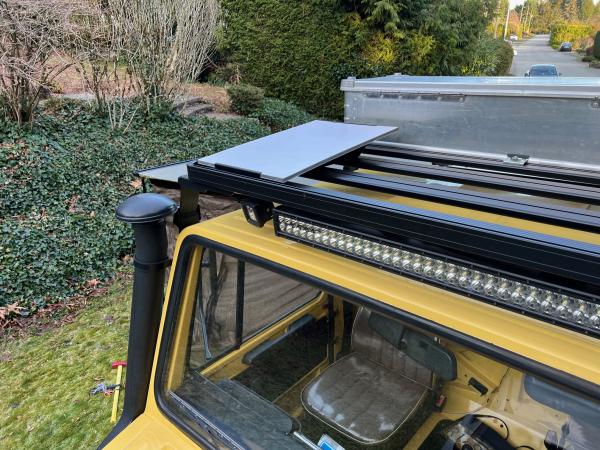
Positioning is everything when installing your satellite dish. According to Starlink’s official installation guidelines, you need an unobstructed view of the sky, typically facing north or south. On your RV roof, this means carefully selecting a location away from air conditioning units, solar panels, and other protrusions that might block satellite signals. Check out our specialised RV mounting solutions to simplify this process.
The mounting process involves more than simply placing the dish on your roof. Robust mounting hardware is crucial to withstand road vibrations, wind resistance, and varying weather conditions. Stainless steel mounting brackets provide the most versatile solution, allowing you to fine-tune your dish’s orientation while maintaining a secure attachment. Use marine-grade sealant around mounting points to prevent potential water ingress, a common issue in mobile installations.
Power and cable routing represent another essential consideration. Plan your cable path meticulously, ensuring minimal exposure to heat sources, sharp edges, or potential mechanical stress. Use cable clips and protective conduits to secure and protect your Starlink system’s electrical connections. Pro tip: leave slight slack in your cables to accommodate RV movement and prevent unnecessary strain.
Verification checklist for dish installation:
- Confirmed clear sky view at mounting location
- Secure and level mounting hardware installation
- Proper cable routing with adequate protection
- No obstructions within satellite signal path
By methodically executing these installation steps, you create a reliable mobile internet setup that can withstand the dynamic environment of RV travel.
Step 4: Connect and Power Up the Starlink System
Powering up your Starlink system marks the transition from installation to connectivity, transforming your RV into a mobile internet hub. This critical stage demands methodical approach and careful attention to electrical and network configurations.
Electrical connection represents the first crucial step. A Starlink DC power conversion is ideal eliminating the need for an inverter the Voltage stability is paramount - fluctuations can result in Starlink Rebooting. For this reason we recommend lithium leisure battery system.
Cable routing requires strategic planning to prevent potential damage and ensure optimal signal transmission. Avoid tight bends or areas prone to mechanical stress. Secure cables using weatherproof clips designed for automotive environments, maintaining sufficient slack to accommodate RV movement. Explore our comprehensive Starlink solutions for additional mounting and cable management insights.
Once connected, the Starlink system initiates an automatic calibration sequence. This process might take 5-10 minutes, checking the Starlink App you will see your Dish within the app once it is connected to the Starlink network, for trouble shooting use you Mobile Internet not the Starlink connected Wifi.
Verification checklist for system power-up:
- Confirmed stable power source connection
- Proper cable routing without mechanical strain
- Check Starlink App for connection
- Initial network detection and signal acquisition
By carefully executing these power-up steps, you establish a reliable mobile internet infrastructure.
This table outlines the main steps of the Starlink RV installation process, along with typical outcomes and core considerations for each stage. It is designed to give a clear overview of the full procedure for efficient planning.
| Step | Main Action | Key Outcome | Core Considerations |
|---|---|---|---|
| 1 | Assess RV requirements | Identify optimal mounting and power solutions | Sky view, surface, electrical system |
| 2 | Purchase equipment | Obtain Starlink kit and accessories | Plan, compatibility, budget |
| 3 | Mount dish and hardware | Secure reliable satellite signal | Sturdy mounting, protection from weather |
| 4 | Connect and power up | Activate system and self-calibration | Stable supply, safe cable routing |
| 5 | Configure and test | Achieve secure, high-speed internet | App setup, speed testing, security |
| Remember that patience during initial setup can prevent future connectivity complications. | |||
Step 5: Configure and Test Your Internet Connection
Configuring your newly installed Starlink system transforms technical hardware into a reliable mobile internet solution. This pivotal stage determines whether your off-grid connectivity dreams become reality or remain frustratingly out of reach.
Mobile app configuration is your primary setup pathway. According to Starlink’s official setup guidelines, download the Starlink mobile app and create an account linked to your specific hardware. The app provides step-by-step guidance, helping you register your device, update firmware, and diagnose potential signal obstructions. Pro tip: ensure your smartphone has a stable cellular connection during this initial configuration process.
Performance testing requires methodical approach. Begin by running multiple speed tests at different times of day to understand your connection’s variability. Realistic expectations are crucial - Starlink RV configurations typically deliver 50-150 Mbps download speeds with 40-100 ms latency. Use built-in app diagnostics and third-party speed testing platforms to comprehensively assess your connection’s performance across various parameters.
Network security represents another critical configuration element. Change default router passwords, enable WPA3 encryption, and consider setting up separate networks for different devices. If your RV hosts multiple users or contains sensitive work equipment, these precautions become even more essential. Treat your mobile internet setup with the same security consciousness you would apply to a home network.
Verification checklist for internet connection configuration:
- Completed Starlink mobile app device registration
- Verified firmware is current
- Conducted multiple speed tests at different times
- Configured network security settings
- Confirmed consistent internet connectivity
By meticulously executing these configuration steps, you establish a robust mobile internet infrastructure. Remember that initial setup patience pays dividends in long-term connectivity reliability. Your Starlink system will continue optimising itself, but your careful configuration provides the critical foundation for seamless off-grid internet access.
Ready for Reliable Off-Grid Internet? Transform Your Starlink RV Setup with Starvmount™
After diving into the essential steps for a seamless Starlink RV installation, you might still find yourself wrestling with issues like mounting challenges, exposure to the elements, stable power delivery, or simply getting the most reliable signal while on the road. Achieving worry-free, high-performance off-grid internet in your RV is about more than following a guide. It is about securing the right hardware and expertise tailored for roaming lifestyles. Discover how our solutions address real pain points, from choosing robust mounting hardware to ensuring safe DC power conversion and tidy cable management. Our comprehensive support guides help you avoid common pitfalls and get the most from your Starlink equipment.
Your next adventure is waiting and reliable connectivity should never be left to chance. Visit Starvmount™ to explore proven mounting solutions, expert guides, and accessories designed especially for Starlink RV users. Act now to secure dependable, on-the-move internet before your next journey begins.
Frequently Asked Questions
How do I assess my RV’s setup requirements for Starlink installation?
To assess your RV’s setup requirements for Starlink installation, evaluate the exterior surfaces for unobstructed sky visibility, confirm your RV’s power system compatibility with the Starlink’s electrical requirements, and check the structural integrity of the mounting surface. Aim for a minimum 12 x 12 inch clear mounting area with an unobstructed view towards the northern sky.
What equipment do I need to purchase for a Starlink RV installation?
Most commonly you will need a Starlink MINI, for power uses, remote works and those that often upload larger files consider Starlink Standard.
What steps should I take to install the Starlink dish on my RV?
Start by selecting a clear mounting location on your RV roof, ensuring an unobstructed view of the sky. Use robust mounting hardware to attach the dish securely, and plan your cable routing carefully to prevent damage. Finally, ensure proper power connection before powering up the system.
How do I configure and test my internet connection after installation?
Download the Starlink mobile app to configure your system, register your device, and update firmware. Conduct multiple speed tests at different times to assess performance, and ensure you’re following best practices for network security by changing default passwords and enabling encryption.